This page describes my homemade home storage battery (DIY Powerwall). It is a grid-connect battery, it charges from my solar array and is built around some windfall lithium cells.
Solar Array
We have a solar array on the roof of a large shed, made with 10 kW of LG panels and a 7 kW SolarEdge inverter. These inverters are sold as ‘battery ready’, but in reality they will only connect to particular types and brands of battery. Since I’m making my own battery, it can’t connect to the Solar Edge inverter on the DC side, and indeed the inverter doesn’t know about it at all. It is only connected on the AC side, the term for this kind of installation being ‘AC coupled’.
Battery
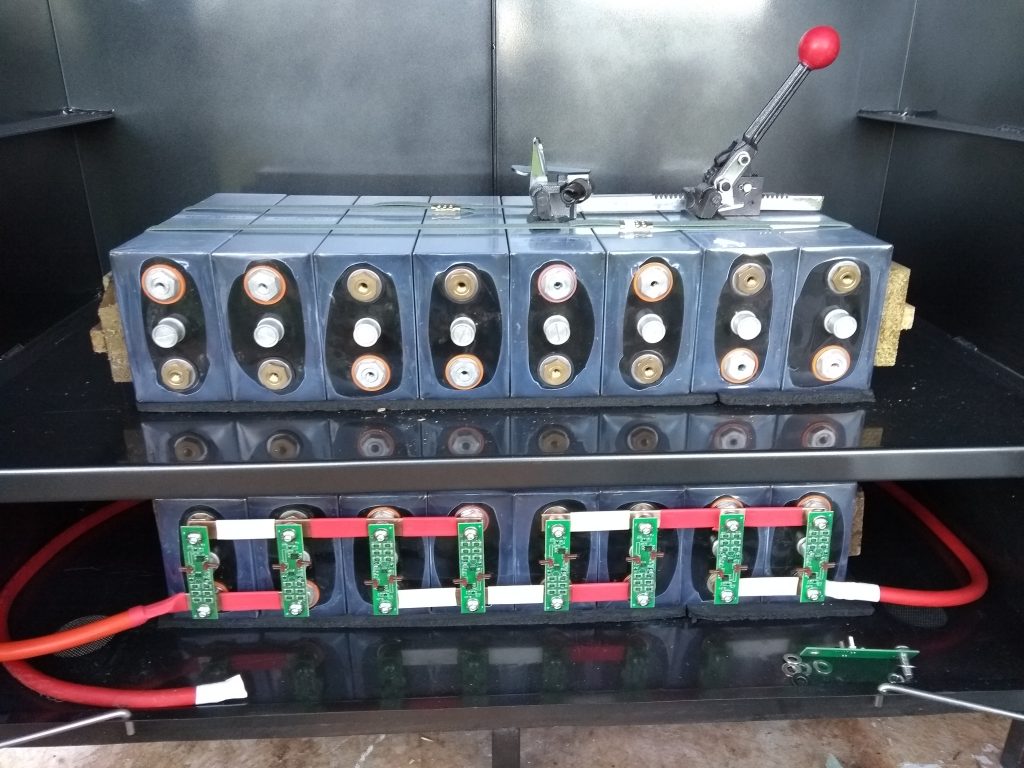
I have 32 LFP (lithium LiFePO4) cells, connected two in parallel and sixteen in series. This makes a nominal 48 V, which is a common voltage used in home battery systems. These cells need to be installed in a way that restricts them from expanding. I’ve done this with a wooden plate on each end and plastic strapping to keep them tight.
The cells are 220 AH nominal, with continuous charge and discharge ratings of 100 and 220 A respectively. The cells were secondhand but not used, see this post for details.
The conductors between the cells are made from squashed copper water pipe. Pipe is much cheaper than copper bus bar and conducts just as well. A friend flattened it for me with a press, and I drilled holes to suit the cells. A bonus is that the copper pipe can also be crimped onto a 50 mm2 copper cable, meaning that I didn’t have to buy extra lugs.
Inverter/Charger
Any battery that will be connected to the grid in Australia needs to be connected by, and that connection certified by, a licenced electrician. If I was going to make this battery myself then I needed to convince an electrician to certify my work. Luckily I found an electrician who was interested in what I was doing. He came around one weekend to have a look at what I’d done with the Brumby conversion, and decided from that conversation that he’d be willing to connect up my battery!
The electrician had two requirements. The first was that I had to purchase an SP Pro inverter, and the second was that I’d need to program it myself. The reasoning here is that the SP Pro is a very flexible beast, and the electrician had worked with them before. He was confident that it would be able to monitor a homemade lithium battery, but also knew that it would take quite a bit of fiddling over some days (or weeks) to get the programming right. So he said that he’d put in some basic programming, show me the ropes and leave me to it. This suited me fine, although the SP Pro is quite pricey! Mind you, everyone I talk to has only praise for the Selectronic SP Pro, ‘bee’s knees’ and ‘duck’s guts’ were mentioned.
I bought the SP Pro SPMC482-AU, which is a 7.5 kW inverter/charger suitable for a 48V battery. The SP Pro controls what’s going on with electricity into and out of the house. You can tell it how full the battery should be, when to import, export, store or use your power, be it from your solar array, wind turbine, the grid or a generator.
See my post on the SP PRO inverter charger for more detail.
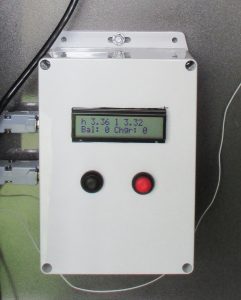
Battery Management System
Lithium cells need to be monitored to ensure that:
- The pack voltage doesn’t go too high
- The pack voltage doesn’t go too low
- A cell voltage doesn’t go too high
- A cell voltage doesn’t go too low
- A cell temperature doesn’t go too high
The first two conditions can be monitored by the SP Pro inverter. But the others need a Battery Management System – a BMS. The BMS will monitor the cell voltages and temperatures, and tell the SP Pro inverter if something has gone wrong. I’ve built my own BMS on a few occasions now, the one in the Brumby probably helped convince the electrician that I knew what I was doing with this system. So I decided to build a BMS to suit these cells.
The BMS I built is called the Low Cost BMS, and is an open-source design that you can build yourself. See my article here where I describe how I did it.
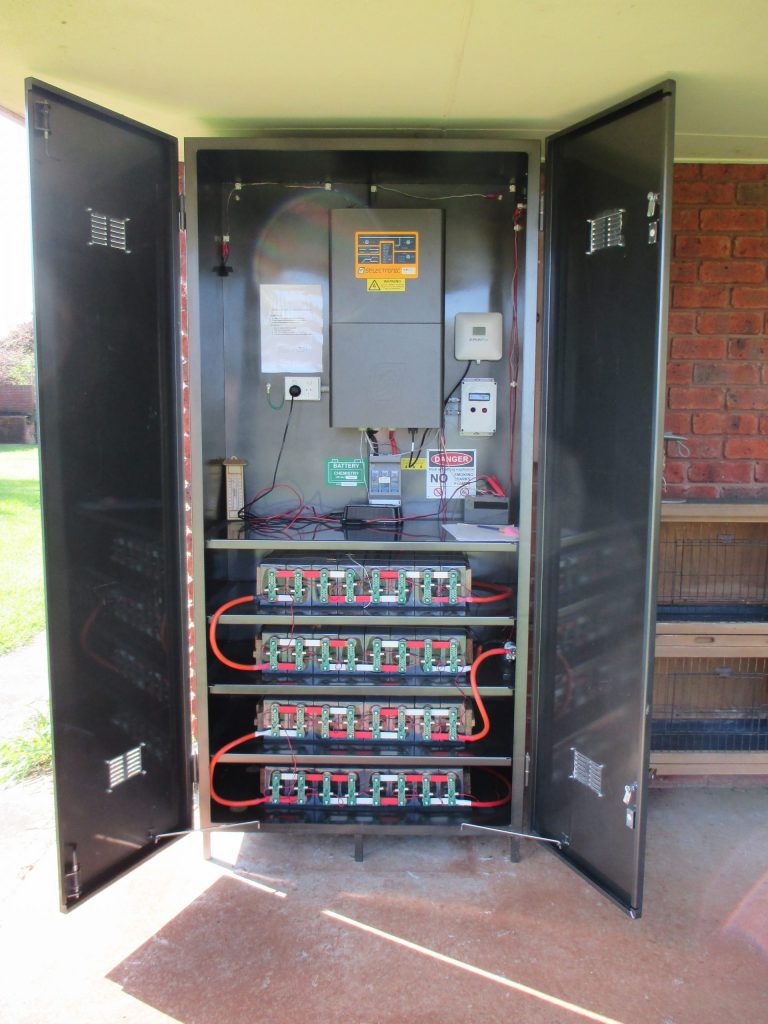
Enclosure
The current Australian standards say that a battery enclosure needs to be outside of a dwelling, and it needs to be reasonably weatherproof, but otherwise doesn’t say much. I considered wood and brick, but ended up having one made by a local sheet metal fabrication place. I designed it big enough to fit the SP Pro as well, since that isn’t particularly waterproof. This cabinet cost me $2500 including painting and installation. My builder says that it will outlast the house!
I’ve installed a fan towards the top of the enclosure in case it gets hot in there. The fan is connected to two thermostats, one on the SP Pro and one on the inside of the cabinet where the summer sun hits it in the afternoon. If either of these thermostats gets to 40°C then the fan turns on. There are vents at the bottom of the enclosure to draw cool air in.
Cost
- Battery: $2000 (32 of the smaller AVASS cells described here)
- Cabinet: $2751 (installed)
- Inverter/Charger: $8411 (installed)
- BMS: $200 (or so)
Total $13,262 installed, if I don’t count my labour. This 20 kWh system is approximately the price of a Tesla Powerwall, which is 13.5 kWh.
Results
After a lengthy commissioning period (about a year!) the system is working well and I generally don’t have to think about it. In summer our solar provides almost all our power and we don’t import much at all, resulting in a negative bill from the electricity company. In the winter our power usage is high due to our electric heating and our generation is low, so we definitely have bills in the winter.
Unfortunately it is difficult to directly compare power bills before and after the battery, since our usage changed over that time with the addition of a second electric car. Dollar values that we pay the electricity company have remained approximately the same. Our usage has probably increased, but the system does not log usage directly so I can’t quantify this.
There are two benefits of the battery which I can measure by checking our power bills. The first one is that we now use more of our solar power ourselves. In the April-July quarter 2019 (no battery) we exported 1051 kWh. The same quarter this year we exported 85 kWh. The difference theoretically went into powering our stuff.
The second benefit is that when we import electricity from the grid, we now use much more off-peak than peak. In April-July 2019 we used 3.6 times as much off-peak as we used peak. This year it was 18 times as much off-peak. Such a small amount of peak usage means that our average electricity tariff is now very close to the off-peak tariff, and went from 17c to 15c per kWh during that period.
I’ve learned a lot with this project, and I may end up saving some money over time. This type of installation is relatively easy to upgrade, for instance if I found some new cells I could increase the size of the battery. Try doing that with a Tesla Powerwall!
I’d like to acknowledge the help obtained from the nice folk at the AEVA forum. You can see my initial musings and questions on my forum post here.
Further Reading
My previous blog post on where I obtained my cells.
I wrote a more detailed blog post on the Selectronic SP PRO inverter/charger.
You can make your own Low Cost BMS.
Great Post. It has me thinking about making my own system as well.One thing that seems a little strange to me though – why do the batteries need to be strapped so tightly together? I’ve worked on plenty of industrial UPS’s and none of them require that type of securing. Any chance you could expand on that?
Hi Bill,
The manufacturers of Lithium cells generally require that they be compressed somewhat, but it will vary from manufacturer to manufacturer. The pouch cells themselves (inside the boxes) can expand in certain circumstances, and if they do so they can delaminate (come apart) internally. Once they start coming apart they don’t work so well, and hot spots can form which could lead to catastrophic failure.
Naked cells definitely need compression, if cells are sold inside boxes (prismatic cells) then the boxes may provide enough restriction – but generally it’s still a good idea to compress the boxes as I’ve done. A routine inspection should include a check for swelling.